Table of Contents
DIY coulombmeter
Useful for testing unknown batteries, or as an external pack monitor
Bill of materials:
- GWUNW OLED Parameter tester (100V, 10A): https://www.aliexpress.com/item/32844522748.html
- XL7015 high voltage module (square-type, green PCB): https://www.aliexpress.com/wholesale?catId=0&origin=y&SearchText=XL7015+
- 26AWG wires, color coded
- Optional enclosure 64x58x35mm (Gainta G302 or equivalent)
Putting it together
Unpack and connect XL7015 module input side to CC limited power supply, set to 12V. Be careful, it's very easy to destroy it.
Then, connect your voltmeter on the output, and adjust potentiometer for 5V output.


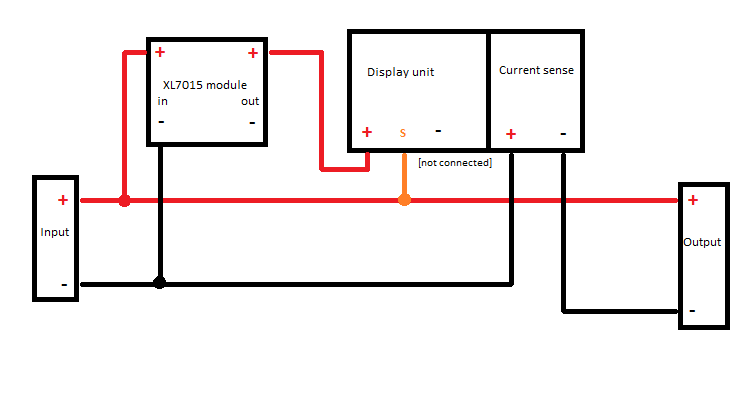
Once set, hotglue it onto the display unit as shown. Wire it up following the wiring diagram below, or the supplementary photo.

Preparing the enclosure
Cut a 45x16mm rectangle hole into the front lid (using a dremel cutter and chisel for example), then slide in the assembly until it clicks together.


Drill approx. 6mm holes into the bottom part sides, one on each side, pull the wires through, then use flowable silicone to seal them. Finally, add a vinyl or tape protective film to avoid moisture from entering the inside.


Connecting battery
Connect power source (battery) on the input side, and the display should turn on, showing approximate battery voltage.
If you want, you can calibrate the unit before use. Double tap the button to enter calibration mode, then hold to get into edit mode for the parameter that needs to be adjusted, and then single click moves the value in that segment up. It's better described in the linked aliexpress listing.
Finally, once you acquire values, to reset them, hold down the button on main screen, then doubletap to switch between parameters, and finally single tap to reset. Hold button to get out of this edit mode.


Conclusion
In spite of XL7015 module being rated for 80V input, it's not recommended to use more than 65V on input side, as the QC of the chip itself is rather poor. I have had mine blow up nearing 70V.
When testing battery packs, tungsten lamps are great as dummy loads. 12V with E27 thread are most common, but you can also find 24V or 48V. Make sure that the dummy load voltage rating matches your input voltage. Put 12V lamps in series to increase voltage rating.